Common field groups let you associate a group of work item fields with a user-defined work item rule so that you can use this group of fields across multiple work item rules. You cannot use common field groups on standard work items.
In general, when you make a change to the common field group, that change is reflected in all of the work items that were created from the work item rule that the common field group is associated with. For example, after creating a common field group, it is associated with two different work item rules: for the NACCT item type and the NIGO item type. Because common fields 1 and 2 were replaced with the custom fields 8 and 22, the common field group was changed and both types of work items were updated.
You can specify in the definition of the common field group that attributes on fields in the group can be overwritten in the work item rule. For example, you can change a field’s attribute from optional to required. If you modify the fields after the common field group is associated with a work item rule, any subsequent changes to that field in the common field group are not reflected on the work item rule. For example, a work item rule for the NACCT item type was updated so that TSF 8 is now a required field. That change is not reflected in the common field group for any other type of work item that XTRAC uses Group A in.
If you specify that attributes on fields in the group can be overwritten with the work item rule but no changes are made to the field, any changes to the field within the definition of the common field group are reflected in all of the work item rules.
Note: Multi-select custom fields are not supported for Common Field Groups. See Multi-Select Custom Fields.
The following rules apply when you create a common field group:
To see how operators interact with work item fields, see the XTRAC Workbench User Guide.
Note: To define a common field group, you need the Create Common Field Group security function as part of the security group that is associated with your entitlement set.
To create a common field group
Note: If you want to add a dynamic field rule, you must save the common field group first.
If you don't want to create a dynamic field rule, skip to Step 9.
Only the fields that are specified in the common field group display in the list of fields.
See Rule Conditions and Building a Rule Condition.
Only the fields that are specified in the common field group display in the list of fields.
The dynamic field rule displays on the Dynamic Field Rule tab in the Common Field Group Detail window.
XTRAC saves the common field group.
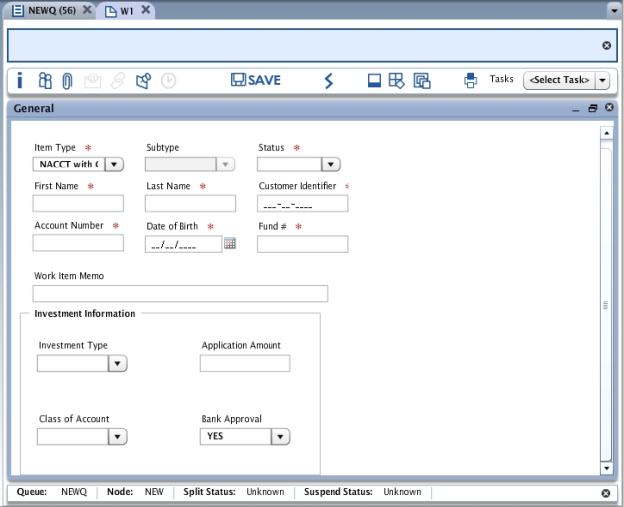
You can include a common field group in a work item rule. The group of fields in the field group display in a group with a label (if you added a label when you created the group) on the applicable work item.
For example, the Investment Information common field group includes four fields:
After you associate a common field group with a work item rule, the following rules apply:
If you are creating a work item template with a large number of fields (both predefined and up to 500 custom fields), we recommend that you use a screen resolution that is large enough to see the entire work item template on your screen. For example, 1280 x 1024.M
When you can see the arrangement of all of the fields on the user-defined work item, you can ensure that the fields do not overlap and prevent boundary conflict errors.
When you are creating a common field group, you determine the layout of the fields within the group.
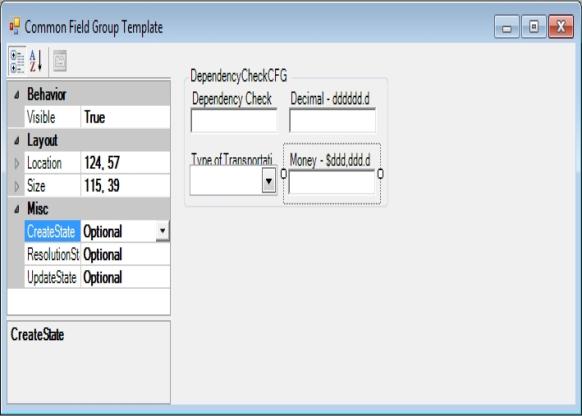
The following rules apply when working with fields on the Common Field Group Template window:
To position the fields in a common field group
XTRAC positions each field in the order that it was defined in the common field group. XTRAC places the field in the next available space in the window, either to the right of the previous field or below the previous field.
The field’s location, size, and attributes (visible or hidden, required, optional, or protected) display in the properties panel on the left side of the window

The default dimension of the template is 4x4 pixels. When you change and save the dimension of the window, XTRAC retains the new size. There are no limitations to the size of the window except that fields cannot cross the window boundaries.
XTRAC displays the attribute changes in the window and on the Common Field Group Template window.
For example, if you want to make a field hidden, from the Visible drop-down list box, select False. If you want to make an optional field required, from the state drop-down list box, select Required. For example, CreateState. XTRAC displays the attribute changes.
Note: XTRAC associates the grid settings with a user. When you make changes to the spacing, XTRAC saves and uses those settings until you change them again.
Work item grid settings control the amount of space between the dots on the Work Item Template window. The dots represent a grid that is used to position work item fields.
Each field is placed at a particular position in the grid, and the field’s size is represented in terms of the grid. For example, you can place a field at 124, 4. The field's location is 124 pixels from the side and 4 pixels from the top.
If you move or resize a field, the grid settings limit where you can place the field. If the grid settings say 4x4 and you move a field, the new location is at least 4 pixels away from the old location. If the grid settings say 10x10, you are limited to a location that is 10 pixels away.
The default minimum grid setting is 4x4.
The following rules also apply:
You can change the default spacing for the grid on the Common Field Group Template window. See Grid Spaces on the Template.
Copyright © 2011-2014 XTRAC, LLC. All rights reserved.